
PDF REST API
The easyPDF Cloud API is a cloud-based platform that allows PDF generation, conversion and automation.
REST API
The easyPDF Cloud API is a cloud-based platform that allows PDF generation, conversion and automation.
This easy-to-use tool eliminates the need for separate APIs for different file formats and works with Word, Excel, PowerPoint, HTML, and images. The easyPDF Cloud API can be called from any language such as .NET, Java and PHP deployed on multiple platforms like Windows, Mac OS, Linux, iOS and Android.
This document describes how to use the common features of the easyPDF Cloud API using the RESTful calling style.
Execution steps
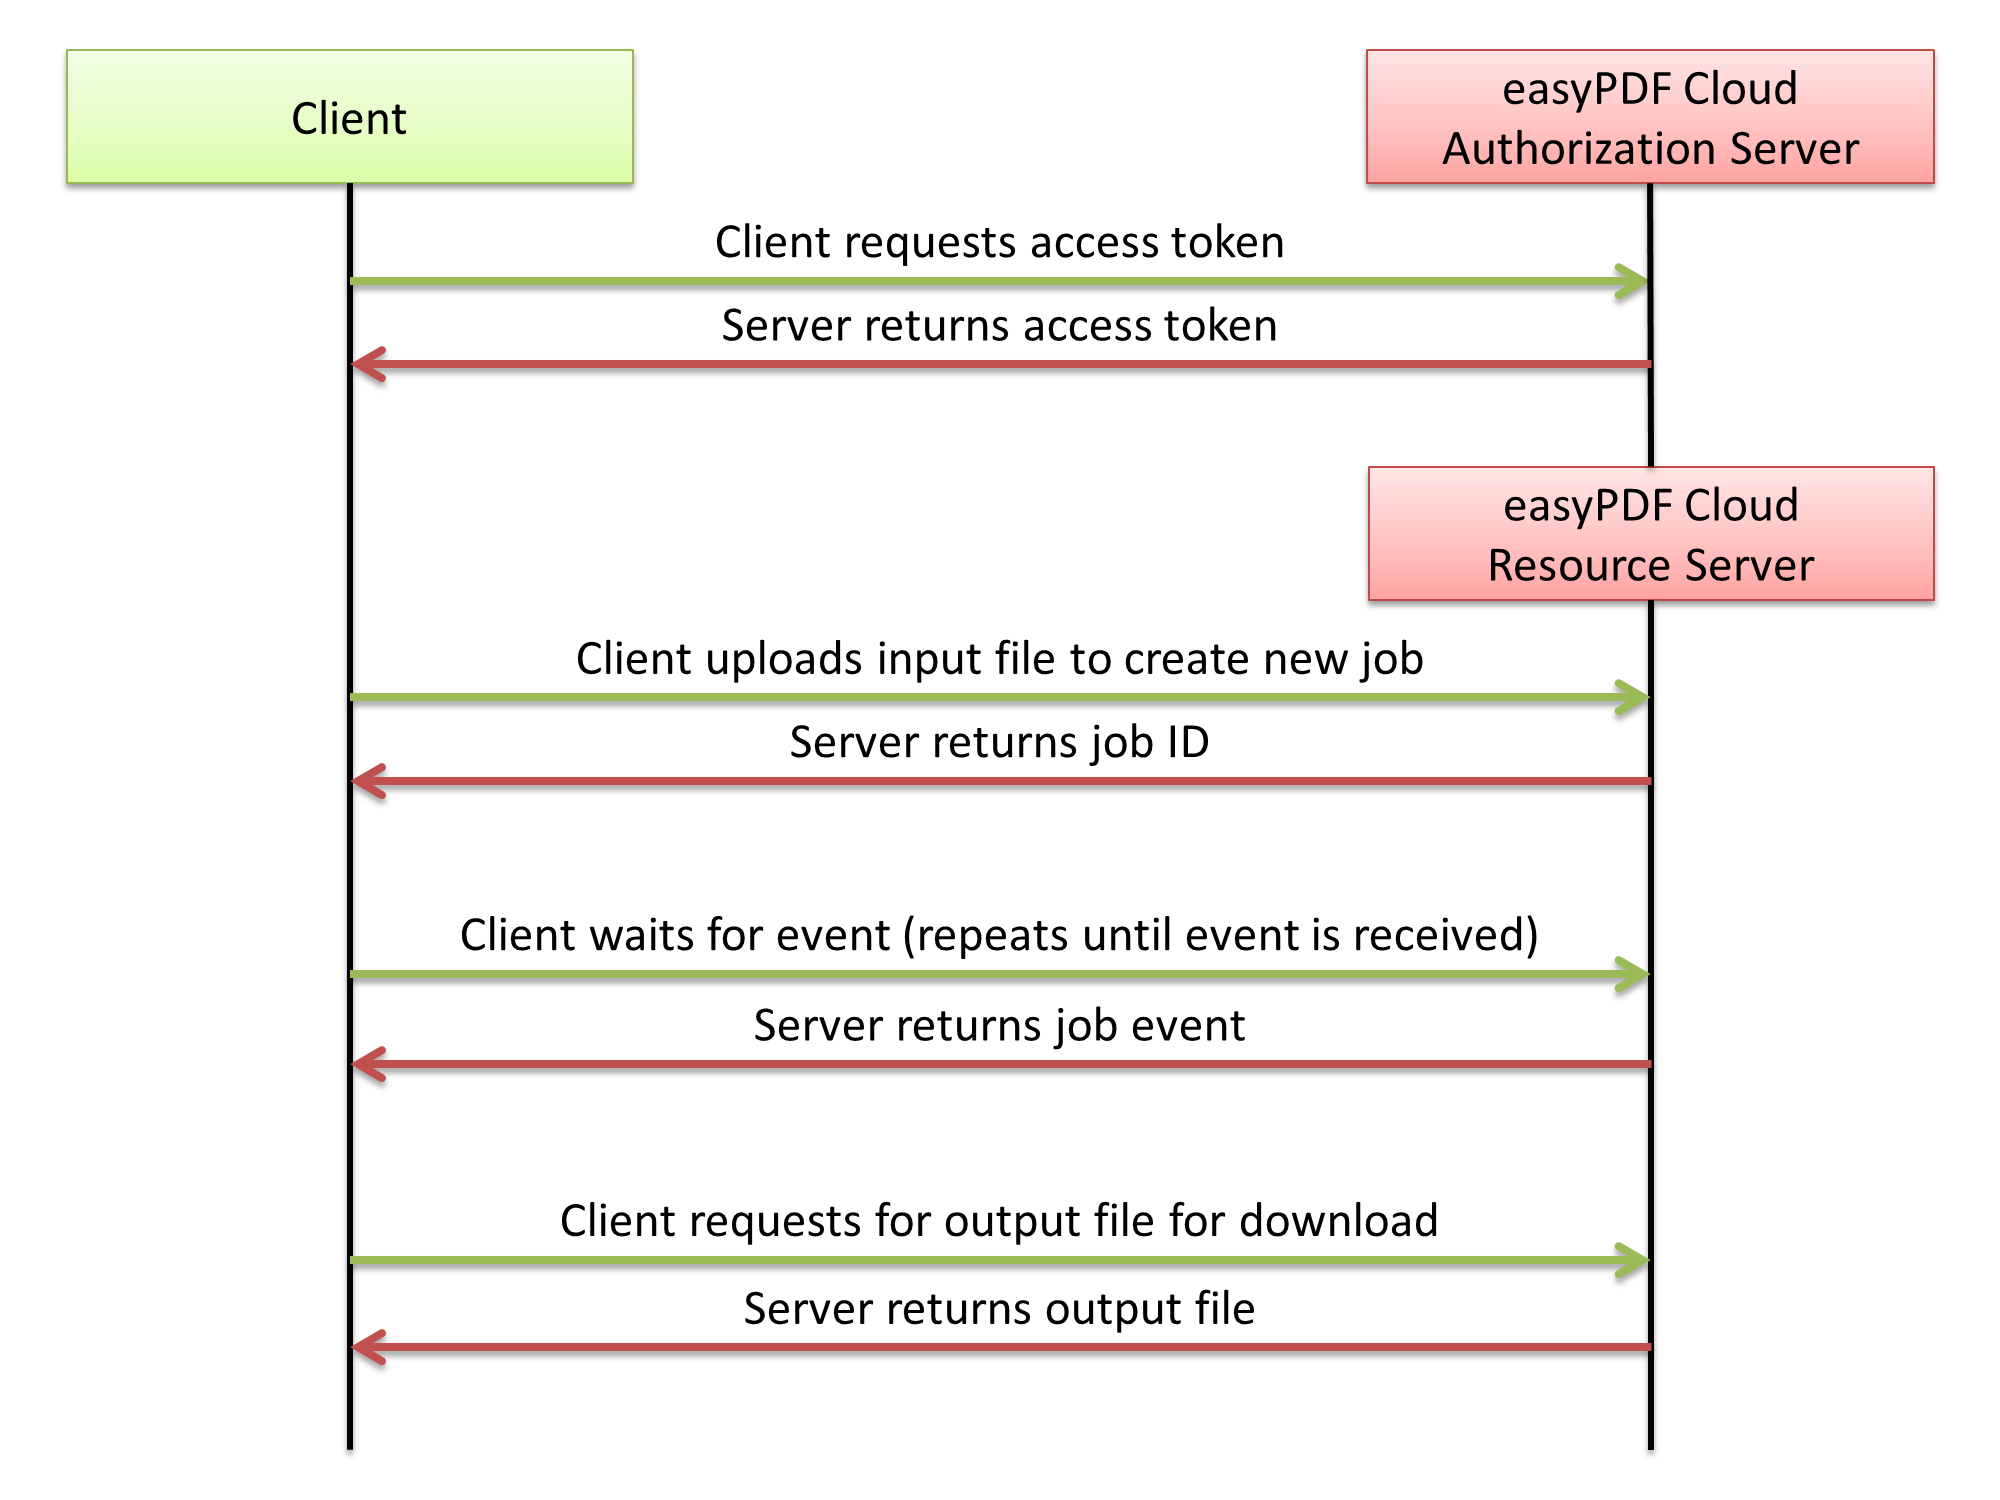
Here are the basic steps to authorizing your app and making REST API call to the easyPDF Cloud:
- Obtain access token by using your client ID and client secret
-
Access easyPDF Cloud API by attaching the obtained access token to every API call
- Create new job by uploading an input file and specifying a workflow ID
- Wait for job completion
- Download output file
- Delete job when finished
- Once you are ready to deploy, contact us to obtain production status for full REST API access
Authorization with OAuth 2.0
easyPDF Cloud APIs use the OAuth 2.0 protocol for authentication and authorization. We currently support the OAuth 2.0 protocol grant types called client credentials grant to cover common web server scenario.
OAuth 2.0 is a relatively simple protocol and a developer can integrate with easyPDF Cloud OAuth 2.0 endpoints without too much effort. The OAuth 2.0 specification is available here.
Info We require that all requests are done over SSL (HTTPS).
Get access token
Obtain an OAuth 2.0 access token.
Important The access token has expiration associated to it. Call this API again to obtain new access token once the expired. For the best performance, reuse the obtained access token as much as possible.
Endpoint
POST https://www.easypdfcloud.com/oauth2/token
Parameters
Important The content type for this endpoint needs to be application/x-www-form-urlencoded.
| Parameter | Value | Description |
|---|---|---|
| grant_type | client_credentials | As defined in the OAuth 2.0 specification, this field must contain a value of client_credentials |
| client_id | The client ID obtained from your app | Indicates the client that is making the request. The value passed in this parameter must exactly match the value specified in your app. |
| client_secret | The client secret obtained from your app | Indicates the password of the client that is making the request. The value passed in this parameter must exactly match the value specified in your app. |
| scope | Space delimited set of permissions the app requests | Indicates the easyPDF Cloud API access your app is requesting. The values passed in this parameter inform the consent page shown to the user. |
Info You can see your client ID and client secret by visiting the developer information page.
You can use following information for demonstration purpose. Sign up for free to get your own.
- Client ID
- 05ee808265f24c66b2b8e31d90c31ab1
- Client secret
- 16ABE87E052059F147BB2A491944BF7EA7876D0F843DED105CBA094C887CBC99
Scopes
| Scope | Description |
|---|---|
| epc.api | Access user's data |
Request example:
POST https://www.easypdfcloud.com/oauth2/token HTTP/1.1
Content-Type: application/x-www-form-urlencoded

grant_type=client_credentials&client_id=<client ID>&client_secret=<client secret>&scope=epc.api
Response
A successful response is returned as a JSON object, similar to the following:
200 OK

{
  "access_token": "<access token>",
  "token_type": "bearer",
  "expires_in": "3600",
  "scope": "epc.api"
}
Response Fields
| Field | Description |
|---|---|
| access_token | The access token issued. You must attach this access token for every easyPDF Cloud API calls |
| token_type | The type of the token issued. This field will always have the value bearer |
| expires_in | Lifetime of the access token in seconds |
| scope | Space delimited set of permissions the app is granted |
Live demo
Calling API
After your app has obtained an access token, your app can access a easyPDF Cloud API by including it in either an access_token query parameter or an Authorization: Bearer HTTP header.
For example, a call to the /workflows API using the access_token query string parameter looks like the following:
GET https://api.easypdfcloud.com/v1/workflows?access_token=<access token> HTTP/1.1
A call to the same API using the access_token Authorization: Bearer HTTP header looks like the following:
GET https://api.easypdfcloud.com/v1/workflows HTTP/1.1
Authorization: Bearer <access token>
If a call to an API fails with an authorization-related error, then the detail of the error will be included in a WWW-Authenticate: Bearer HTTP response header like the following:
400 Bad Request
WWW-Authenticate: Bearer error="invalid_request",error_description="Missing%20access%20token."
Create new job
Upload a file and create a new workflow job.
Endpoint
POST/PUT https://api.easypdfcloud.com/v1/workflows/{id}/jobs
| Parameter | Description |
|---|---|
| id | The workflow ID |
Info You can obtain the workflow ID either by visiting the developer information page or by calling the workflows API.
You can use following information for demonstration purpose. Sign up for free to get your own.
| Name | ID |
|---|
You can also create a new workflow.
Required scopes
Request Parameters
| Parameter | Default | Description |
|---|---|---|
| A file to upload | See the description below about uploading a file using POST or PUT method. | |
| start | true |
Specify whether to start the job execution automatically when a new job is created. Info If you are merging multiple files, then specify false here, and then upload more files. Once all files are uploaded, start job execution. |
| test | false |
Specify whether to run the job execution as test mode. Info If true is specified, then the job is executed as a test mode and your API credits will not be used. |
Uploading a file
- For POST
-
To upload a file using POST method, you must format the request as multipart/form-data.
You provide the file to upload in a multipart section, while you provide the file name
in the Content-Disposition header's filename parameter.
Note that only one multipart section is supported in the body of the request.
- For PUT
-
To upload a file using PUT method, you provide the file to upload in a request body
(this is the only thing included in the request body), while you provide the file name
as part of the URL path.
Request example (POST):
POST https://api.easypdfcloud.com/v1/workflows/000000000000027C/jobs HTTP/1.1
Content-Type: multipart/form-data; boundary=MyBoundaryABCDEFGHIJKLMNOP

--MyBoundaryABCDEFGHIJKLMNOP
Content-Disposition: form-data; name="file"; filename="sample file.pdf"
Content-Type: application/pdf
<The contents of the sample file.pdf will be inserted here>
--MyBoundaryABCDEFGHIJKLMNOP--
Request example (PUT):
PUT https://api.easypdfcloud.com/v1/workflows/000000000000027C/jobs?file=sample%20file.pdf HTTP/1.1
Content-Type: application/pdf

<The contents of the sample file.pdf will be inserted here>
Response
A successful response is returned as a JSON object, similar to the following:
201 Created

{
  "jobID": "00000000000CB20D",
  "workflowID": "000000000000027C"
}
Response Fields
| Field | Description |
|---|---|
| jobID | The ID of the newly created job |
| workflowID | The workflow ID for this job |
Live demo
Wait for job completion event
Wait for an event for the jobs being processed.
Endpoint
POST https://api.easypdfcloud.com/v1/jobs/{id}/event
| Parameter | Description |
|---|---|
| id | The event ID |
Required scopes
Request Parameters
There are no request parameters for this method
Request example:
POST https://api.easypdfcloud.com/v1/jobs/00000000000CB20D/event HTTP/1.1
Response
A successful response is returned as a JSON object, similar to the following:
200 OK

{
  "jobID": "00000000000CB20D",
  "workflowID": "000000000000027C",
  "status": "completed",
  "finished": true,
  "progress": 100,
  "detail": {
    "apiCredits": {
      "creditsRemaining": 320,
      "notEnoughCredits": false
    }
  }
}
Important This API waits for an event for up to 30 seconds. If the job execution does not complete within this duration, HTTP status code 202 (Accepted) along with a JSON object containing an error message will be returned, similar to the following:
202 Accepted

{
  "message": "No change detected"
}
If this HTTP status code is returned, you can call this API again to further wait for the job completion.
Response Fields
| Field | Description |
|---|---|
| jobID | The job ID |
| workflowID | The workflow ID for this job |
| status | Status of the job being processed |
| finished | true if the job is finished (when the status value is either completed, failed, or cancelled); false otherwise |
| progress | Progress in percentage of the job being processed |
| detail | Detailed information about this job |
Detailed Response Fields
| Field | Description |
|---|---|
| apiCredits | Information about API credits |
| ocrCredits | Information about OCR credits (this field will appear only if OCR is used) |
API/OCR credits Response Fields
| Field | Description |
|---|---|
| creditsRemaining | Remaining credits |
| notEnoughCredits | true if the job failed because of not enough credits; false otherwise |
Live demo
Download output file
Download output files or retrieve file properties.
Endpoint
GET https://api.easypdfcloud.com/v1/jobs/{id}/output/{filename}
| Parameter | Description |
|---|---|
| id | The job ID |
| filename |
File name. optional Omit this parameter if you want to specify all output files instead of a single file |
Required scopes
Request Parameters
| Parameter | Default | Description |
|---|---|---|
| type | file | Specify metadata for reading file properties. Specify file for downloading file(s) |
Request example:
GET https://api.easypdfcloud.com/v1/jobs/00000000000CB20D/output/sample%20file.pdf?type=file HTTP/1.1
Response
A successful response is returned as either a file object or a JSON object, similar to the following:
Sample response data for downloading a single output file
200 OK
Content-Type: application/pdf

<The contents of the sample file.pdf>
Sample response data for downloading multiple output files
200 OK
Content-Type: application/zip

<The contents of all output files (zipped)>
Sample response data for meta data (single output file)
200 OK

{
  "isFolder": false,
  "name": "sample file.pdf",
  "bytes": 265273,
  "mime": "application/pdf",
  "createdDate": "2012-10-24T00:00:26.8118301Z"
  "modifiedDate": "2012-10-24T00:00:26.8118301Z"
}
Sample response data for meta data (all output files)
200 OK

{
  "isFolder": true,
  "name": "input",
  "bytes": 0,
  "createdDate": "2012-11-08T12:26:38.9947396Z",
  "modifiedDate": "2012-11-08T12:26:38.9947396Z",
  "contents": [
    {
      "isFolder": false,
      "name": "sample file.pdf",
      "bytes": 265273,
      "mime": "application/pdf",
      "createdDate": "2012-10-24T00:00:26.8118301Z",
      "modifiedDate": "2012-10-24T00:00:26.8118301Z",
    },
    {
      "isFolder": false,
      "name": "sample file 02.pdf",
      "bytes": 265273,
      "mime": "application/pdf",
      "createdDate": "2012-10-24T00:00:26.9522265Z",
      "modifiedDate": "2012-10-24T00:00:26.9522265Z",
    },
  ]
}
Response Fields
| Field | Description |
|---|---|
| isFolder | true if the resource is a file list; false if the resource is a single file |
| name | Name of the resource |
| bytes | File size in bytes. 0 if the resource is a file list |
| mime | MIME type of the file. This field is available only for the file resource |
| createdDate | The time when the resource was created (when available) |
| modifiedDate | The last time the resource was modified (when available) |
| contents | A list of files. This field is available only if the isFolder parameter is true |
Live demo
Delete job
Delete a job.
Endpoint
DELETE https://api.easypdfcloud.com/v1/jobs/{id}
| Parameter | Description |
|---|---|
| id | The job ID |
Required scopes
Request Parameters
There are no parameters for this method
Request example:
DELETE https://api.easypdfcloud.com/v1/jobs/00000000000CB20D HTTP/1.1
Response
There are no additional data returned as a response
200 OK
Live demo
Additional APIs
Following APIs are less frequently used, but needed for achieving additional feature such as combining multiple files.
Upload additional input file
Upload more input files.
Important The file upload must be done before the job execution starts.
Endpoint
POST/PUT https://api.easypdfcloud.com/v1/jobs/{id}/input
| Parameter | Description |
|---|---|
| id | The job ID |
Required scopes
Request Parameters
| Parameter | Default | Description |
|---|---|---|
| A file to upload | See the description below about uploading a file using POST or PUT method. |
Uploading a file
- For POST
-
To upload a file using POST method, you must format the request as multipart/form-data.
You provide the file to upload in a multipart section, while you provide the file name
in the Content-Disposition header's filename parameter.
Note that only one multipart section is supported in the body of the request.
- For PUT
-
To upload a file using PUT method, you provide the file to upload in a request body
(this is the only thing included in the request body), while you provide the file name
as part of the URL path.
Request example (POST):
POST https://api.easypdfcloud.com/v1/jobs/00000000000CB20D/input HTTP/1.1
Content-Type: multipart/form-data; boundary=MyBoundaryABCDEFGHIJKLMNOP

--MyBoundaryABCDEFGHIJKLMNOP
Content-Disposition: form-data; name="file"; filename="sample file.pdf"
Content-Type: application/pdf

<The contents of the sample file.pdf will be inserted here>
--MyBoundaryABCDEFGHIJKLMNOP--
Request example (PUT):
PUT https://api.easypdfcloud.com/v1/jobs/00000000000CB20D/input/sample%20file.pdf HTTP/1.1
Content-Type: application/pdf

<The contents of the sample file.pdf will be inserted here>
Response
There are no additional data returned as a response
200 OK
Live demo
Start/stop the job execution
Start/stop the job execution.
Endpoint
POST https://api.easypdfcloud.com/v1/jobs/{id}
| Parameter | Description |
|---|---|
| id | The job ID |
Required scopes
Request Parameters
| Parameter | Default | Description |
|---|---|---|
| operation | start | Set this parameter to start to start job execution, or stop to cancel the job execution. |
Request example:
POST https://api.easypdfcloud.com/v1/jobs/00000000000CB20D HTTP/1.1
Content-Type: application/x-www-form-urlencoded

operation=stop
Response
There are no additional data returned as a response
200 OK
Live demo
Get job information
Retrieve information about a job, or a list of jobs.
Endpoint
GET https://api.easypdfcloud.com/v1/jobs/{id}
| Parameter | Description |
|---|---|
| id | The job ID |
Required scopes
Request Parameters
There are no parameters for this method
Request example:
GET https://api.easypdfcloud.com/v1/jobs/00000000000CB20D HTTP/1.1
Response
A successful response is returned as a JSON object, similar to the following:
200 OK

{
  "jobID": "00000000000CB20D",
  "workflowID": "000000000000027C",
  "status": "completed",
  "finished": true,
  "progress": 100,
  "detail": {
    "apiCredits": {
      "creditsRemaining": 320,
      "notEnoughCredits": false
    }
  }
}
Response Fields
Same as the response fields for Wait for job completion API.Live demo
Get workflow information
Retrieve information about a workflow, or list of workflows.
Endpoint
GET https://api.easypdfcloud.com/v1/workflows/{id}
| Parameter | Description |
|---|---|
| id |
The workflow ID optional Omit this parameter if you want to list all workflows |
Info You can obtain the workflow ID either by visiting the developer information page or by calling the workflows API.
You can use following information for demonstration purpose. Sign up for free to get your own.
| Name | ID |
|---|
You can also create a new workflow.
Required scopes
Request Parameters
There are no parameters for this method
Request example:
GET https://api.easypdfcloud.com/v1/workflows/000000000000027C HTTP/1.1
Response
A successful response is returned as a JSON object, similar to the following:
Sample response data for a single workflow
200 OK

{
  "workflowID": "000000000000027C",
  "workflowName": "Convert to PDF"
}
Sample response data for workflow list
200 OK

{
  "workflows": [
    {
      "workflowID": "000000000000027C",
      "workflowName": "Convert to PDF"
    },
    {
      "workflowID": "000000000000027D",
      "workflowName": "Convert to Word"
    }
  ]
}
Response Fields
| Field | Description |
|---|---|
| workflowID | The workflow ID |
| workflowName | The workflow name |
| workflows | List of workflows |
Live demo
Get workflow setting
Retrieve setting information about a workflow
Endpoint
GET https://api.easypdfcloud.com/v1/workflows/{id}/setting
| Parameter | Description |
|---|---|
| id | The workflow ID |
Info You can obtain the workflow ID either by visiting the developer information page or by calling the workflows API.
You can use following information for demonstration purpose. Sign up for free to get your own.
| Name | ID |
|---|
You can also create a new workflow.
Required scopes
Request Parameters
There are no parameters for this method
Request example:
GET https://api.easypdfcloud.com/v1/workflows/000000000000027C/setting HTTP/1.1
Response
A successful response is returned as a JSON object, similar to the following:
200 OK

{
  "Tasks": [
      ...
  ]
}
Live demo
Create new job with custom workflow
Create a new job using custom workflow setting.
Endpoint
POST/PUT https://api.easypdfcloud.com/v1/jobs
Required scopes
Request Parameters
| Parameter | Default | Description |
|---|---|---|
| A workflow setting |
Specify workflow setting. POST For POST method, provide workflow setting in the "setting" parameter. PUT For PUT method, provide workflow setting in a request body. Info You can obtain existing workflow setting and use it as your base setting. |
|
| test | false |
Specify whether to run the job execution as test mode. Info If true is specified, then the job is executed as a test mode and your API credits will not be used. |
Request example (POST):
POST https://api.easypdfcloud.com/v1/jobs HTTP/1.1
Content-Type: application/x-www-form-urlencoded

setting=%7B%0D%0A%20%20%22Tasks%22%3A...%0A%20%20%5D%0D%0A%7D
Request example (PUT):
PUT https://api.easypdfcloud.com/v1/jobs HTTP/1.1
Content-Type: application/json

{
  "Tasks": [
    ...
  ]
}
Response
A successful response is returned as a JSON object, similar to the following:
201 Created

{
  "jobID": "00000000000CB20D",
  "workflowID": "0000000000000000"
}
Response Fields
| Field | Description |
|---|---|
| jobID | The ID of the newly created job |
| workflowID | The workflow ID for this job. The value will always be 0000000000000000. |
Next After the job is created, upload input file and then start job execution.
Live demo
Client libraries & samples
You can download sample codes for .NET, Node.js, PHP and Java from below links.
Important You need to embed your client ID, client secret, and a workflow ID into the sample code.
You can use following information for demonstration purpose. Sign up for free to get your own.
- Client ID
- 05ee808265f24c66b2b8e31d90c31ab1
- Client secret
- 16ABE87E052059F147BB2A491944BF7EA7876D0F843DED105CBA094C887CBC99
| Workflow Name | Workflow ID |
|---|
You can also create a new workflow.
Programming languages / Platforms
Package Manager:
PM> Install-Package Bcl.EasyPdfCloud> dotnet add package Bcl.EasyPdfCloudExample 1: Using pre-created workflow (workflow ID):
using Bcl.EasyPdfCloud;

// Create easyPDF Cloud API client object
var client = new Client("<client ID>", "<client secret>");

// Upload input file and start new job
var job = await client.StartNewJobAsync("<workflow ID>", "C:\Users\someone\input.docx");

// Wait until job execution is completed
using (var result = await job.WaitForJobExecutionCompletionAsync())
{
  // Save output to file
  using (var fs = new FileStream("C:\Users\someone\output.pdf", FileMode.Create, FileAccess.Write))
  {
    await result.FileData.Stream.CopyToAsync(fs);
  }
}
Example 2: Using dynamically created workflow:
using Bcl.EasyPdfCloud;
using Bcl.EasyPdfCloud.Workflow;
using Bcl.EasyPdfCloud.Workflow.Enums;

// Create easyPDF Cloud API client object
var client = new Client("<client ID>", "<client secret>");

// Dynamically create workflow
var workflowSetting = new WorkflowSetting();

// Add "Add watermark" task
var addWatermarkToPdfTask = workflowSetting.AddNewAddWatermarkToPdfTask();

// Configure watermark settings
addWatermarkToPdfTask.Angle = 45;
addWatermarkToPdfTask.OutlineOnly = true;
addWatermarkToPdfTask.Text = "Watermark";

// Upload input file and start new job
var job = await client.StartNewJobAsync(workflowSetting, "C:\Users\someone\input.pdf");

// Wait until job execution is completed
using (var result = await job.WaitForJobExecutionCompletionAsync())
{
  // Save output to file
  using (var fs = new FileStream("C:\Users\someone\output.pdf", FileMode.Create, FileAccess.Write))
  {
    await result.FileData.Stream.CopyToAsync(fs);
  }
}
- .NET Standard 2.0 compatible platform such as:
- .NET Framework 4.6.1 and later
- .NET Core 2.0 and later
npm install easypdfcloud-nodeExample 1: Using pre-created workflow (workflow ID):
"use strict";

const fs = require('fs');
const easyPdfCloud = require('easypdfcloud-node');

(async () => {
  // Create easyPDF Cloud client object
  const client = new easyPdfCloud.Client('<client ID>', '<client secret>');

  // Upload input file and start new job
  const job = await client.startNewJob('<workflow ID>', '/Users/someone/input.docx');

  // Wait until job execution is completed
  const result = await job.waitForJobExecutionCompletion();

  // Save output to file
  fs.writeFileSync('/Users/someone/output.pdf', result.fileData.blob, 'binary');
})();
Example 2: Using dynamically created workflow:
"use strict";

const fs = require('fs');
const easyPdfCloud = require('easypdfcloud-node');

(async () => {
  // Create easyPDF Cloud client object
  const client = new easyPdfCloud.Client('<client ID>', '<client secret>');

  // Dynamically create workflow
  const workflowSetting = new easyPdfCloud.WorkflowSetting();

  // Add "Add watermark" task
  const addWatermarkToPdfTask = workflowSetting.AddNewAddWatermarkToPdfTask();

  // Configure watermark settings
  addWatermarkToPdfTask.Angle = 45;
  addWatermarkToPdfTask.OutlineOnly = true;
  addWatermarkToPdfTask.Text = 'Hello';

  // Upload input file and start new job
  const job = await client.startNewJob(workflowSetting, '/Users/someone/input.pdf');

  // Wait until job execution is completed
  const result = await job.waitForJobExecutionCompletion();

  // Save output to file
  fs.writeFileSync('/Users/someone/output.pdf', result.fileData.blob, 'binary');
})();
Example 3: Using TypeScript:
"use strict";

import * as fs from 'fs';
import * as easyPdfCloud from 'easypdfcloud-node';

(async () => {
  // Create easyPDF Cloud client object
  const client = new easyPdfCloud.Client('<client ID>', '<client secret>');

  // Dynamically create workflow
  const workflowSetting = new easyPdfCloud.WorkflowSetting();

  // Add "Convert PDF to Word" task
  const convertPdfToWordTask = workflowSetting.AddNewConvertPdfToWordTask();

  // Upload input file and start new job
  const job = await client.startNewJob(workflowSetting, '/Users/someone/input.pdf');

  // Wait until job execution is completed
  const result = await job.waitForJobExecutionCompletion();

  // Save output to file
  fs.writeFileSync('/Users/someone/output.docx', result.fileData.blob, 'binary');
})();
- Node.js 8.0 and later
// Create easyPDF Cloud client object
$client = new \Bcl\EasyPdfCloud\Client($clientId, $clientSecret);
// Upload input file and start new job
$job = $client->startNewJobWithFilePath($workflowId, $inputFileName);
// Wait until job execution is completed
$result = $job->waitForJobExecutionCompletion();
// Save output to file
\file_put_contents($outputFileName, $result->getFileData()->getContents());
- PHP 5.3 or higher
- Download sample code
- Unzip downloaded sample code
-
Open the file called program.php, and enter following information at the beginning of the code:
- Client ID
- Client secret
- Workflow ID
- Input file path
- Output directory
- Run the file called program.php
// Create easyPDF Cloud client object
try (Client client = new com.easypdfcloud.Client(clientId, clientSecret)) {
  // Upload input file and start new job
  try (Job job = client.startNewJob(workflowId, inputFileName)) {
    // Wait until job execution is completed
    try (JobExecutionResult result = job.waitForJobExecutionCompletion()) {
      // Save output to file
      Files.copy(result.getFileData().getStream(), outputFilePath);
    }
  }
}
- Java 7 or higher
- NetBeans IDE
- Maven (NetBeans IDE 8.0 and higher comes with Maven bundeled)
- Download sample code
- Unzip downloaded sample code
-
Open the file called Program.java (it's located in src/main/java/sample), and enter following information at the beginning of the code:
- Client ID
- Client secret
- Workflow ID
- Input file path
- Output directory
- Build and run
- REST API
- Execution steps
- OAuth 2.0
- 0. Get access token
- Calling API
- 1. Create new job
- 2. Wait for job completion
- 3. Download output file
- 4. Delete job
- Additional APIs
- Upload additional input file
- Start/stop job execution
- Get job information
- Get workflow information
- Get workflow setting
- Set workflow dynamically
- Client libraries & samples